source: AZ500-AzureSecurityTechnologies

Lab Scenario:
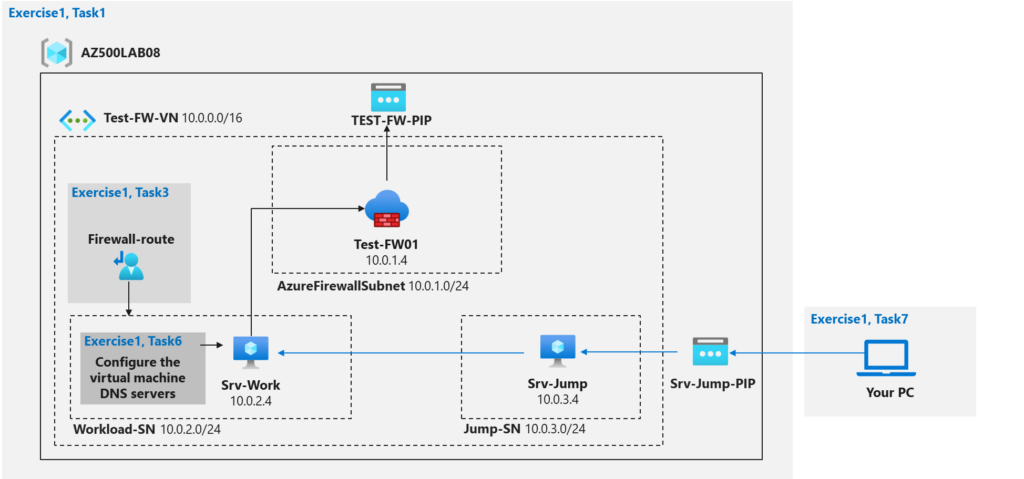
- A virtual network with a workload subnet and a jump host subnet.
- A virtual machine is each subnet.
- A custom route that ensures all outbound workload traffic from the workload subnet must use the firewall.
- Firewall Application rules that only allow outbound traffic to www.bing.com.
- Firewall Network rules that allow external DNS server lookups.
- Task 1: Use a template to deploy the lab environment.
- Task 2: Deploy an Azure firewall.
- Task 3: Create a default route.
- Task 4: Configure an application rule.
- Task 5: Configure a network rule.
- Task 6: Configure DNS servers.
- Task 7: Test the firewall.
Task 1: Use a template to deploy the lab environment.
Go to search bar and type template, select Deploy a custom template > Build your own template in the editor > and paste the lab template from the lab and click save
AZ500-AzureSecurityTechnologies/Allfiles/Labs/08/template.json

On the Custom Deployment page make sure the following settings are configured (leave any others with their default values):
| Subscription | the name of the Azure subscription you will be using in this lab |
| Resource group | click Create new and type the name AZ500LAB08 |
| Location | (US) East US |
| adminPassword | A secure password of your own choosing for the virtual machines. Remember the password. You will need it later to connect to the VMs. |

click review and create
Task 2: Deploy the Azure firewall
On search bar type firewall select firewalls > + Create

We will use the following configuration
| Resource group | AZ500LAB08 |
| Name | Test-FW01 |
| Region | (US) East US |
| Firewall SKU | Standard |
| Firewall management | Use Firewall rules (classic) to manage this firewall |
| Choose a virtual network | click the Use existing option and, in the drop-down list, select Test-FW-VN |
| Public IP address | clck Add new and type the name TEST-FW-PIP and click OK |

Click review and create, go ahead and create
Once the firewall is deployed we need to click go to resource > and copy the Private IP address for future use

Task 3: Create a default route
Now we need to create a default route for the Workload-SN subnet. This route will configure outbound traffic through the firewall.
on the search bar type route and click on route tables > + Create > and use the following configuration

| Resource group | AZ500LAB08 |
| Region | East US |
| Name | Firewall-route |

go ahead and create, once created click on go to resource > subnets > + Associate

On the Associate subnet blade, specify the following settings:
| Setting | Value |
|---|---|
| Virtual network | Test-FW-VN |
| Subnet | Workload-SN |

Click OK, now click on Routes > + Add

We will use the following configuration:
| Setting | Value |
|---|---|
| Route name | FW-DG |
| Address prefix destination | IP Address |
| Destination IP addresses/CIDR ranges | 0.0.0.0/0 |
| Next hop type | Virtual appliance |
| Next hop address | the private IP address of the firewall that you identified in the previous task |
>**Note**: Azure Firewall is actually a managed service, but virtual appliance works in this situation.
Click add
Task 4: Configure an application rule
In this task you will create an application rule that allows outbound access to www.bing.com
On search bar type firewall, click on Firewalls > open Test-FW01 > Rules (classic) > Application rule collection >

we will use the following configuration and click add once filled out like so:
| Name | App-Coll01 |
| Priority | 200 |
| Action | Allow |
| name | AllowGH |
| Source type | IP Address |
| Source | 10.0.2.0/24 |
| Protocol port | http:80, https:443 |
| Target FQDNS | www.bing.com |

Task 5: Configure a network rule
Go back to Test-FW01, click Rules (classic) > Network rule collection > + Add network rule collection

In this task, you will create a network rule that allows outbound access to two IP addresses on port 53 (DNS).
We will use the following settings (leave others with their default values):
| Name | Net-Coll01 |
| Priority | 200 |
| Action | Allow |
| Setting | Value |
|---|---|
| Name | AllowDNS |
| Protocol | UDP |
| Source type | IP address |
| Source Addresses | 10.0.2.0/24 |
| Destination type | IP address |
| Destination Address | 209.244.0.3,209.244.0.4 |
| Destination Ports | 53 |

Note: The destination addresses used in this case are known public DNS servers.
Click on Add
Task 6: Configure the virtual machine DNS servers
In this task, you will configure the primary and secondary DNS addresses for the virtual machine. This is not a firewall requirement.
Go to resource groups > AZ500LAB08 > Srv-Work > Settings > Networking > Network interface
On the Srv-Work | Networking blade, click the link next to the Network interface entry.

Go to Settings section, click DNS servers, select the Custom option, add the two DNS servers referenced in the network rule: 209.244.0.3 and 209.244.0.4, and click Save to save the change.

Note: Wait for the update to complete.
Note: Updating the DNS servers for a network interface will automatically restart the virtual machine to which that interface is attached, and if applicable, any other virtual machines in the same availability set.
Task 7: Test the firewall
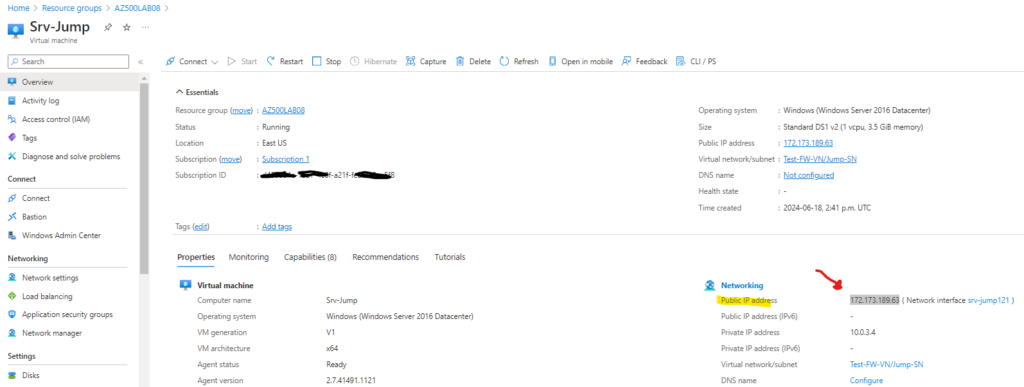
Go to AZ500LAB08 resource group > Srv-Jump > and copy the public IP address

On your own computer open RDP
Enter the public IP address of Srv-Jump and click connect > enter your credentials previously configured

Once connected to the Srv-Jump, open cmd and run the following command to RDP to the Srv-Work vm, enter the same credentals we had previously setup.
mstsc /v:Srv-Workmstsc: This is the command-line executable for Microsoft Terminal Services Client, which is used to start a Remote Desktop Protocol (RDP) session./v: This switch specifies the remote computer to which you want to connect.Srv-Work: This is the hostname or IP address of the remote computer.

Within the Remote Desktop session to Srv-Work, in Server Manager, click Local Server and then click IE Enhanced Security Configuration.
In the Internet Explorer Enhanced Security Configuration dialog box, set both options to Off and click OK.

Within the Remote Desktop session to Srv-Work, start Internet Explorer and browse to https://www.bing.com.
Note: The website should successfully display. The firewall allows you access.

Browse to http://www.microsoft.com/
Note: Within the browser page, you should receive a message with text resembling the following: HTTP request from 10.0.2.4:xxxxx to microsoft.com:80. Action: Deny. No rule matched. Proceeding with default action. This is expected, since the firewall blocks access to this website.

Result: You have successfully configured and tested the Azure Firewall.
Clean up resources
PowerShell session within the Cloud Shell pane, run the following to remove the resource group you created in this lab:
Remove-AzResourceGroup -Name "AZ500LAB08" -Force -AsJob