source: AZ500-AzureSecurityTechnologies
- Create a Senior Admins group containing user account Joseph Price as its member (Azure portal)
- Create a Junior Admins group containing the user account Isabel Garcia as its member (PowerShell)
- Create a Service Desk group containing the user account of Dylan Williams as its member. (Bash)
- Assign the Virtual Machine Contributor role to the Service Desk group.

Exercise 1: Create the Senior Admins group with the user account Joseph Price as its member using the Azure Portal
Task 1: Create new user Joseph Price
On the Azure Portal go to Entra ID > click Users > click New user > select Create new user

enter the following: (make sure Auto-generate password is enabled)

Click review and create the new user.
Task2: Create a Senior Admins group and add the user account of Joseph Price to the group.
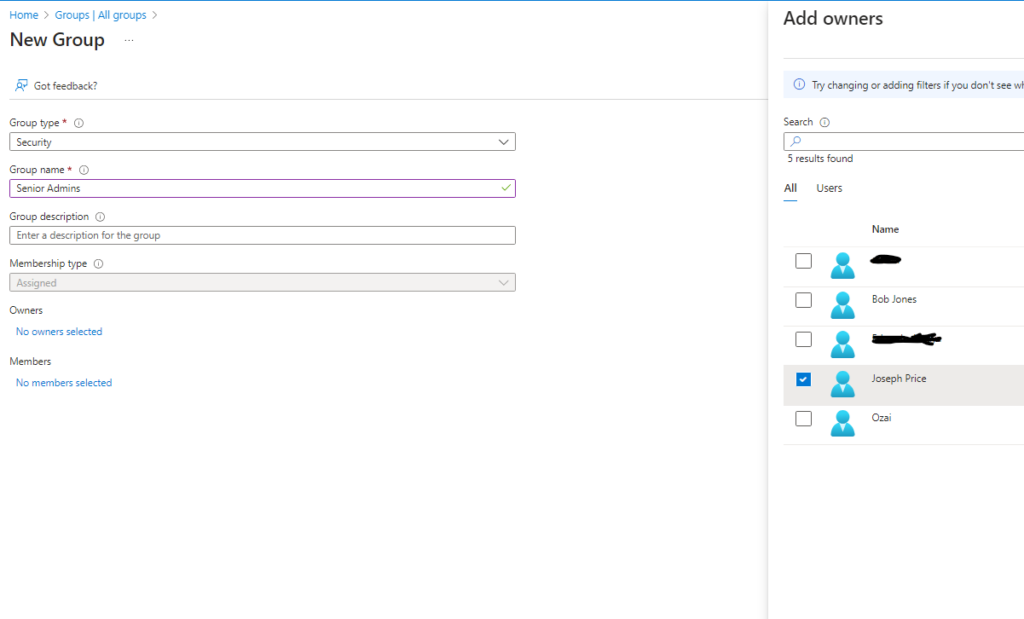
On the Azure Portal go to Entra ID > click Groups > click New Group
Enter the following:
Group type: Security
Group name: Senior Admins
Membership type: Assigned
Owner: Joseph Price
Members: Joseph Price

Exercise 2: Create a Junior Admins group containing the user account of Isabel Garcia as its member using PowerShell on Cloud Shell
Task 1: Use PowerShell to create a user account for Isabel Garcia.
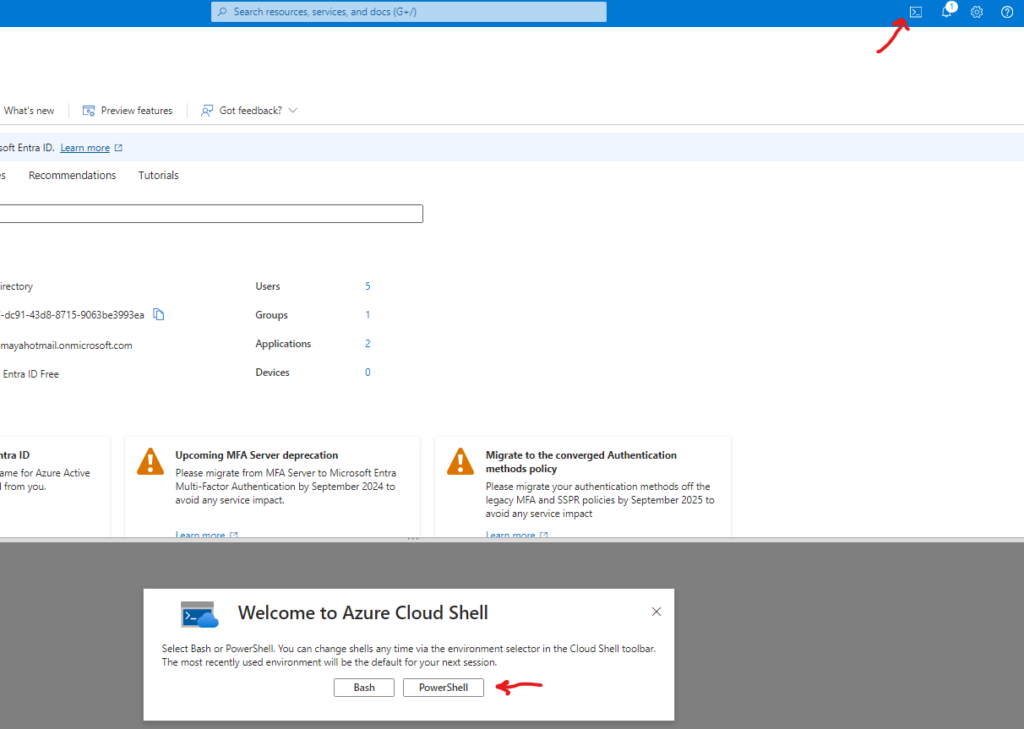
Open Cloud Shell by selecting it from the right top corner and select PowerShell

we will create a password profile object with the following command
$passwordProfile = New-Object -TypeName Microsoft.Open.AzureAD.Model.PasswordProfilewe will define the following values of the password profile object
$PasswordProfile = @{
  Password = 'Helo123!'
  ForceChangePasswordNextSignIn = $true
  ForceChangePasswordNextSignInWithMfa = $true
}
connect it to Entra ID with the following command
Connect-MgGraph -Scopes "User.ReadWrite.All", "Group.ReadWrite.All", "AuditLog.Read.All", "RoleManagement.Read.Directory"**If Microsoft Graph command line tool is not yet connected to Entra ID you will be prompted to authenticate and grant permissions for the app to modify RBAC settings, make sure the user you authenticate has the correct assigned role (application administrator)

We will run the following command to create a variable named domainName which will contain our actual domain name and this variable will be used in the next command
$domainName = ((Get-MgOrganization).VerifiedDomains)[0].NameYou can use echo $domainName to verify the domain name
Run the following to install Microsoft Graph Users module
Install-Module Microsoft.Graph.Users
We will need to grants the Microsoft Graph application permission to access directory information on behalf of the signed-in user by running the following:
Connect-MgGraph -Scopes "Directory.AccessAsUser.All"
**for the next step make sure the user you authenticated with has the correct assigned role (user administrator)
We will create a user account for Isabel Garcia with the following command
New-MgUser -DisplayName 'Isabel Garcia' -PasswordProfile $passwordProfile -UserPrincipalName "Isabel@$domainName" -MailNickName 'Isabel' -AccountEnabled
Lastly, run the following to list Microsoft Entra ID users (the accounts of Joseph and Isabel should appear on the listed):
Get-MgUserTask2: Use PowerShell to create the Junior Admins group and add the user account of Isabel Garcia to the group.
Lets create Junior Admins group and add the user account of Isabel Garcia to the group by using PowerShell, run the following to create a new security group named Junior Admins:
New-MgGroup -DisplayName "Junior Admins" -MailEnabled:$false -SecurityEnabled:$true -MailNickName JuniorAdmins
we will set the variable $user to obtain a reference to the user account of Isabel Garcia:
$user =Get-MgUser -Filter "MailNickName eq 'Isabel'"we will set the variable $targetGroup to obtain a reference to the Junior Admins group:
$targetGroup = Get-MgGroup -ConsistencyLevel eventual -Search '"DisplayName:Junior Admins"'Now we can run the following to add the user account of Isabel to the Junior Admins group:
New-MgGroupMember -DirectoryObjectId $user.id -GroupId $targetGroup.id
Exercise 3: Create a Service Desk group containing the user account of Dylan Williams as its member using Azure CLI
Task 1: Use Azure CLI to create a user account for Dylan Williams.
Open Cloud Shell by selecting it from the right top corner and select Bash
We will set the variable DOMAINNAME to identify the name of your Microsoft Entra tenant:
DOMAINNAME=$(az ad signed-in-user show --query 'userPrincipalName' | cut -d '@' -f 2 | sed 's/\"//')run the following to create a user, Dylan Williams:
az ad user create --display-name "Dylan Williams" --password "Pa55w.rd1234" --user-principal-name Dylan@$DOMAINNAMErun the following to list Microsoft Entra ID user accounts (the list should include user accounts of Joseph, Isabel, and Dylan)
az ad user list --output table
Task 2: Use Azure CLI to create the Service Desk group and add the user account of Dylan to the group.
run the following to create a new security group named Service Desk:
az ad group create --display-name "Service Desk" --mail-nickname "ServiceDesk"we will run the following to list the Microsoft Entra ID groups (the list should show Service Desk, Senior Admins, and Junior Admins groups):
az ad group list -o table
We will set the variable USER as a reference to the user account of Dylan Williams:
USER=$(az ad user list --filter "displayname eq 'Dylan Williams'")Run the following to obtain the objectId property of the user account of Dylan Williams:
OBJECTID=$(echo $USER | jq '.[].id' | tr -d '"')Run the following to add the user account of Dylan to the Service Desk group:
az ad group member add --group "Service Desk" --member-id $OBJECTIDExercise 4: Assign the Virtual Machine Contributor role to the Service Desk group.
Task 1: Create a resource group
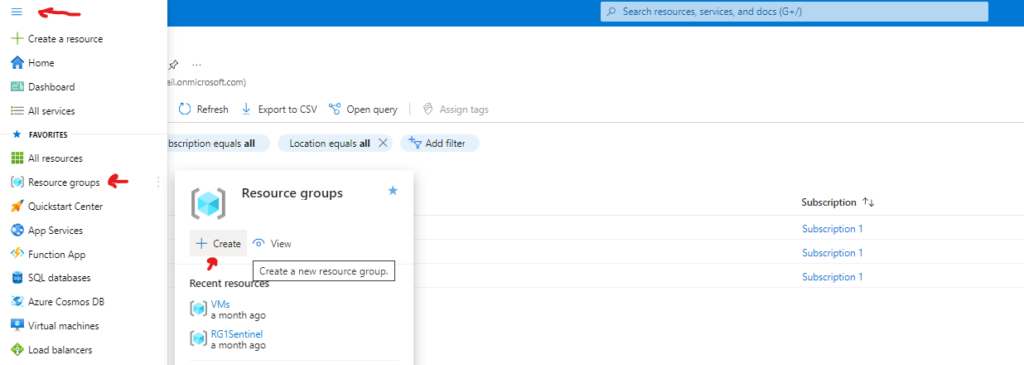
click on the azure portal menu and select Resource groups > Create

use the following values, select review and create
| Subscription name | the name of your Azure subscription |
| Resource group name | AZ500Lab01 |
| Location | East US |
Go to the newly created resource group > AZ500Lab01 > Access Control (IAM) > select Role Assignments > click + Add > Add role assignment
use the following values and click review and assign:
| Role in the search tab | Virtual Machine Contributor |
| Assign access to (Under Members Pane) | User, group, or service principal |
| Select (+Select Members) | Service Desk |

We can now check access to the resources on resource group AZ500Lab01 by using the check access tool

We can enter Dylan Williams and we can see this user has the Virtual Machine Contributor role under the Service Desk group.

We can enter Joseph Price and we can see this user has no access to this resource

We can now use Azure CLI to cleanup resource group created for this lab by running the following Powershell line:
Remove-AzResourceGroup -Name "AZ500LAB01" -Force -AsJob