Wazuh(XDR), Shuffle(SOAR), TheHive(Case Management), Digital Ocean Cloud(PaaS)
LAB 1: Mimikatz detection, automating email and alert creation in Wazuh and TheHive using Shuffle
Sysmon Configuration on local Windows VM
In this lab we will assume we already have our Windows 10 VM installed.
Download Sysmon and extract its contents to a folder
https://learn.microsoft.com/en-us/sysinternals/downloads/sysmon
Download Sysmon Modular config file
https://github.com/olafhartong/sysmon-modular
On sysmon-modular GitHub site go to Sysmonmodular.xml > click on raw > right click and save as “Sysmon config”

Make sure your Sysmon extracted files and Sysmon-modular config file are in the same folder
Open PowerShell as admin and change directories to the folder were the Sysmon extracted files and Sysmon-modular config file are located, and run the following to install:
.\Sysmon64.exe -i .\sysmonconfig.xml
we open task manager > services and look for Sysmon64 to verify it is up and running

Digital Ocean Cloud Firewall configuration
We will set up a firewall rule that allows access to specified cloud resources only from our originating public IP address (this will deny any attack bots to reach our virtual machines (droplets))
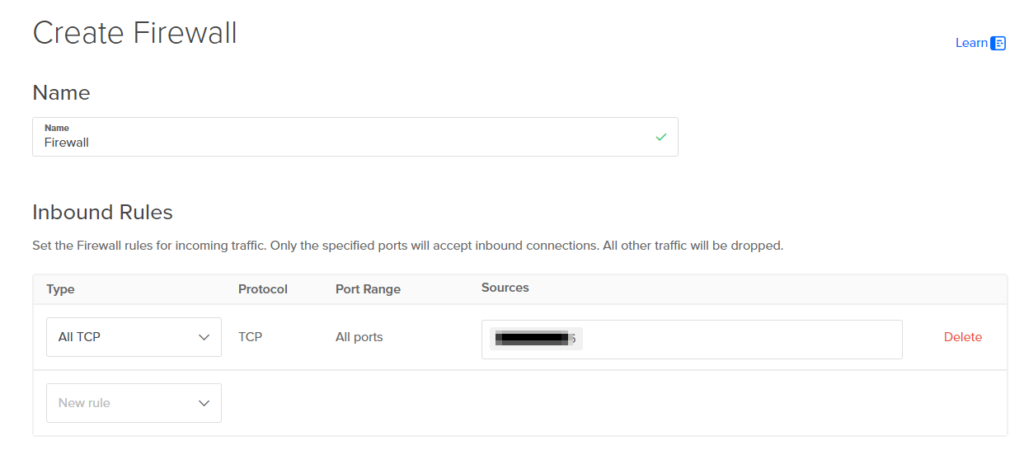
On Digital Ocean go to Networking > Firewalls > click create Firewall
Remove the default Inbound Rule
We will configure the following rule
All TCP > TCP > All ports > your public IP address
Click create firewall
Digital Ocean Ubuntu VM configuration for Wazuh Server
Select Region closest to you in my case I will use Toronto
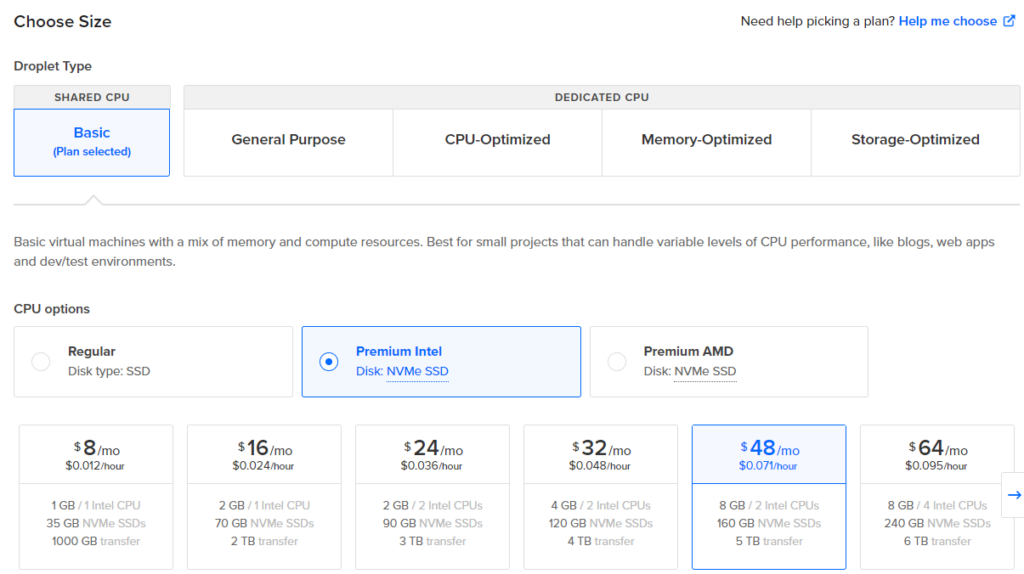
Select the following specs for your Droplet (VM)
OS Ubuntu
Version 22.04 LTS x64
Droplet Type Basic
CPU Premium Intel > $48/mo 8GB 160GB 5TB
Select a password for your VM
Change the Hostname to Wazuh
Under tag add Wazuh
Now we can go ahead and create the Droplet (VM)
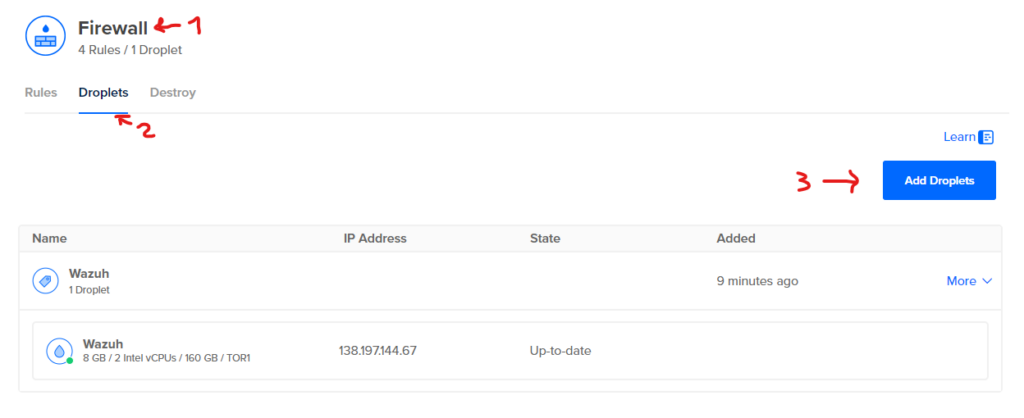
Add Droplet (Wazuh) to Firewall (Important!!)
Go to Networking > Firewalls > Firewall > Droplets > Add Droplets > enter the name/tag of the droplet > click add
Connecting to the Wazuh on Droplet (VM)
I will be using Putty to connect from my local windows machine to the Wazuh VM on the cloud

use root as your username and enter the password you configured on the vm

Once connected we will update our Ubuntu OS in our VM using
apt-get update && apt-get upgrade -y
click enter for any windows that come up during the update until update is complete
Installing Wazuh
https://documentation.wazuh.com/current/quickstart.html
We will download and run the installation assistant using the following
curl -sO https://packages.wazuh.com/4.9/wazuh-install.sh && sudo bash ./wazuh-install.sh -a
When installation is completed you should get a username and a password to login to the Wazuh server

Now we can use the public IP of our droplet (VM) and enter it into a web browser to access the Wazuh Server portal

Digital Ocean Ubuntu VM configuration for TheHive
Select Region closest to you in my case I will use Toronto
Select the following specs for your Droplet (VM)
OS Ubuntu
Version 22.04 LTS x64
Droplet Type Basic
CPU Premium Intel > $48/mo 8GB 160GB 5TB
Select a password for your VM
Change the Hostname to TheHive
Under tag add TheHive
Now we can go ahead and create Droplet (VM)
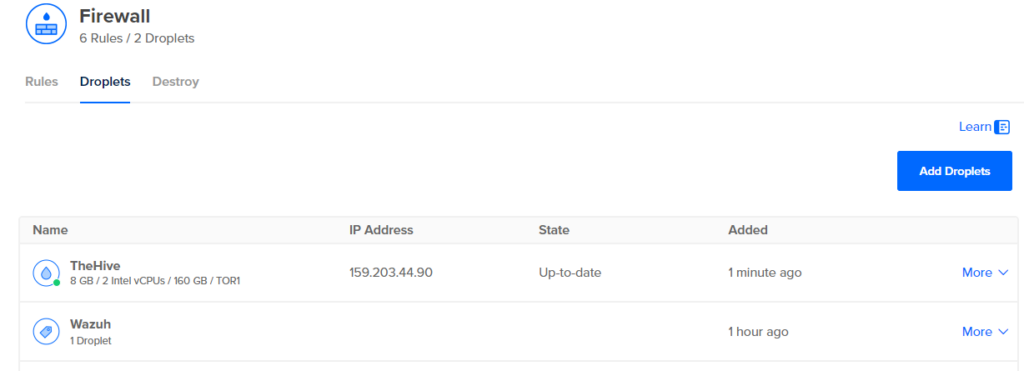
Add Droplet (TheHive) to Firewall (Important!!)
Go to Networking > Firewalls > Firewall > Droplets > Add Droplets > enter the name/tag of the droplet > click add
Connecting to the Wazuh on Droplet (VM)
I will be using Putty to connect from my local windows machine to TheHive VM on the cloud

use root as your username and enter the password you configured on the vm

Once connected we will update our Ubuntu OS in our VM using
apt-get update && apt-get upgrade -y
click enter for any windows that come up during the update until update is complete
Installing TheHive
To install the hive we will need to install Java, Cassandra, Elasticsearch and TheHive.
Install Javawget -qO- https://apt.corretto.aws/corretto.key | sudo gpg --dearmor -o /usr/share/keyrings/corretto.gpg
echo "deb [signed-by=/usr/share/keyrings/corretto.gpg] https://apt.corretto.aws stable main" | sudo tee -a /etc/apt/sources.list.d/corretto.sources.list
sudo apt update
sudo apt install java-common java-11-amazon-corretto-jdk
echo JAVA_HOME="/usr/lib/jvm/java-11-amazon-corretto" | sudo tee -a /etc/environment
export JAVA_HOME="/usr/lib/jvm/java-11-amazon-corretto"
Install Cassandra
wget -qO - https://downloads.apache.org/cassandra/KEYS | sudo gpg --dearmor -o /usr/share/keyrings/cassandra-archive.gpg
echo "deb [signed-by=/usr/share/keyrings/cassandra-archive.gpg] https://debian.cassandra.apache.org 40x main" | sudo tee -a /etc/apt/sources.list.d/cassandra.sources.list
sudo apt update
sudo apt install cassandra
Install Elasticsearch
wget -qO – https://artifacts.elastic.co/GPG-KEY-elasticsearch | sudo gpg –dearmor -o /usr/share/keyrings/elasticsearch-keyring.gpg
sudo apt-get install apt-transport-https
echo “deb [signed-by=/usr/share/keyrings/elasticsearch-keyring.gpg] https://artifacts.elastic.co/packages/7.x/apt stable main” | sudo tee /etc/apt/sources.list.d/elastic-7.x.list
sudo apt update
sudo apt install elasticsearch
Install TheHive
wget -O- https://archives.strangebee.com/keys/strangebee.gpg | sudo gpg --dearmor -o /usr/share/keyrings/strangebee-archive-keyring.gpg
echo 'deb [signed-by=/usr/share/keyrings/strangebee-archive-keyring.gpg] https://deb.strangebee.com thehive-5.2 main' | sudo tee -a /etc/apt/sources.list.d/strangebee.list
sudo apt-get update
sudo apt-get install -y thehive
Configuring Cassandra
We need to modify Cassandra configuration file, in order to do so on TheHive Droplet VM we will type-in
nano /etc/cassandra/cassandra.yaml
Change rpc_address, listen_address and seed_provider to the public IP of your TheHive Droplet VM


Press Ctrl+O to save changes and Ctrl+X to exit
now we will stop cassandra service
systemctl stop cassandra.service
remove old cassandra filesrm -rf /var/lib/cassandra/*
start cassandra servicesystemctl start cassandra.service
verify status of cassandra servicesystemctl status cassandra.service

Configuring Elasticsearch
We will modify Elasticsearch configuration file, in order to do so on TheHive Droplet VM we will type-in
nano /etc/elasticsearch/elasticsearch.yml
We will comment out cluster.name and node.name to enable it

Enable network.host and enter the public IP of TheHive droplet VM, enable http.port

We will also enable cluster.initial_master_nodes

Press Ctrl+O to save changes and Ctrl+X to exit
now we can start, enable and check the status of elasticsearch
systemctl start elasticsearch
systemctl enable elasticsearch
systemctl status elasticsearch

now we need to change ownership to thehive user and thehive group of the /opt/thp directory
chown -R thehive:thehive /opt/thp


Configuring TheHive configuration file
We will modify TheHive configuration file, in order to do so on TheHive Droplet VM we will type-in
nano /etc/thehive/application.conf
Change hostname to the public IP of TheHive Droplet VM, change cluster-name to the cluster name we configured on the Cassandra configuration

Change application.baseUrl and replace localhost with your public IP of TheHive Droplet VM

Press Ctrl+O to save changes and Ctrl+X to exit
now we can start thehive service
systemctrl start thehive.service
systemctrl enable thehive.service
systemctrl status thehive.service

make sure to use http and not https on your address in order to reach the login page and not get ssl connection problems. (I.E. http://159.203.44.90:9000/)

use default username admin@thehive.local and password secret (you can change the password once logged in)
Configure Wazuh Agent
We will generate the Wazuh agent for our local windows vm
On the hamburger icon for menu go to Menu > Server management > Endpoints summary > click on Deploy new agent
Select the operating system the agent will be installed on
Enter the Wazuh server address the agent will report to, in my case it will be the Wazuh Droplet VM IP address

As per the continuing steps, run the specified command provided by Wazuh based on the client operating system.


We can see our Wazuh agent was successfully deployed and is online and active in our dashboard

Configuring Wazuh Agent to ingest Sysmon logs from the local Windows VM
In order to ingest Sysmon logs into our Wazuh Agent we need to go to
C:\Program Files (x86)\ossec-agent
make a back up copy of the ossec.conf file and open it with notepad
Under log analysis is were we specify where we are ingesting events from
will make a copy of the localfile block

In this new copy we will enter sysmon localfile name which we can get from Event Viewer

For the sake of this tutorial we only are interested in sysmon logs, so we will remove application, security and system event ingestion, our config file should look as the following, go ahead and save it, make sure notepad is open as administrator to be able to save it

After saving the ossec.conf file make sure to restart the sysmon service

Excluding Downloads folder from threat protection and downloading mimikatz
We will be downloading mimikatz for detection and test purposes, so we need to be able to do so without Windows Defender blocking it. We will exclude Downloads folder from threat protection by doing the next steps
Windows Security > Virus & Threat protection > Virus & threat protection settings manage settings > Exclusions > add or remove exclusions > Add an exclusion > Folder > Downloads

now we can go to the following link > click on Releases 2.2.0 > mimikatz_trunk.zip
GitHub – gentilkiwi/mimikatz: A little tool to play with Windows security
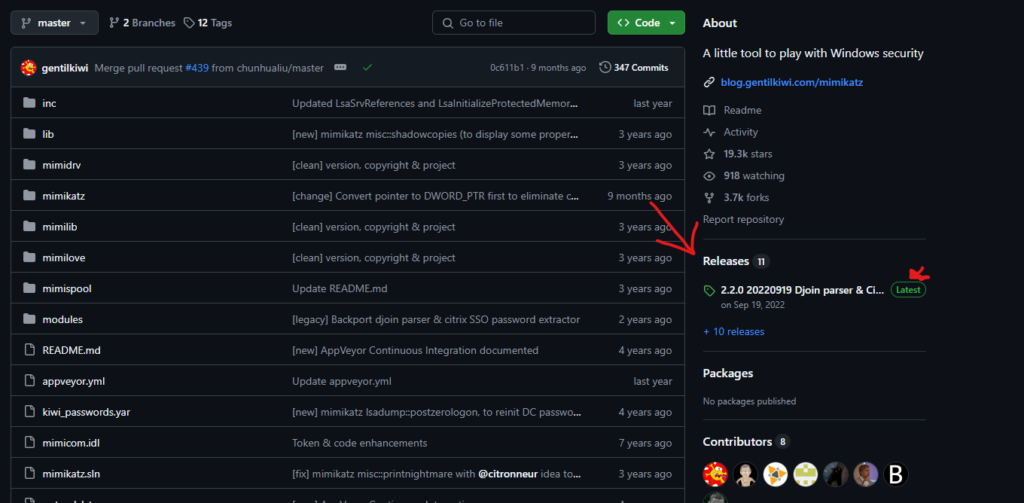
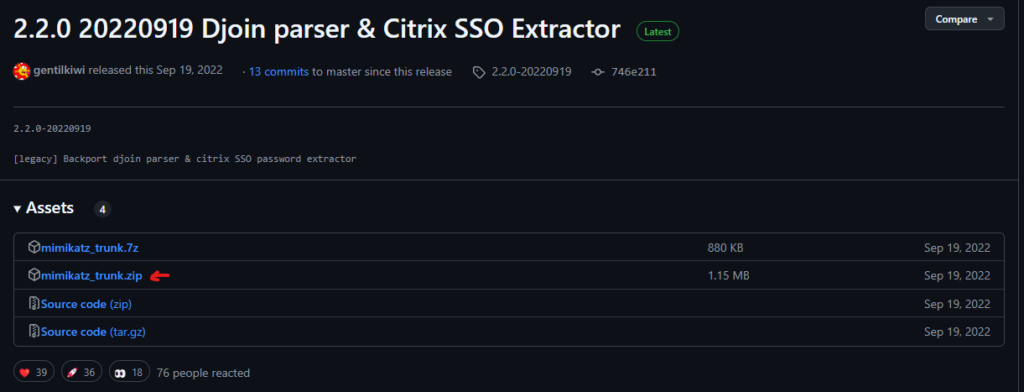
Creating Wazuh rule to detect mimikatz and create and test alert
https://wazuh.com/blog/learn-to-detect-threats-on-windows-by-monitoring-sysmon-events/
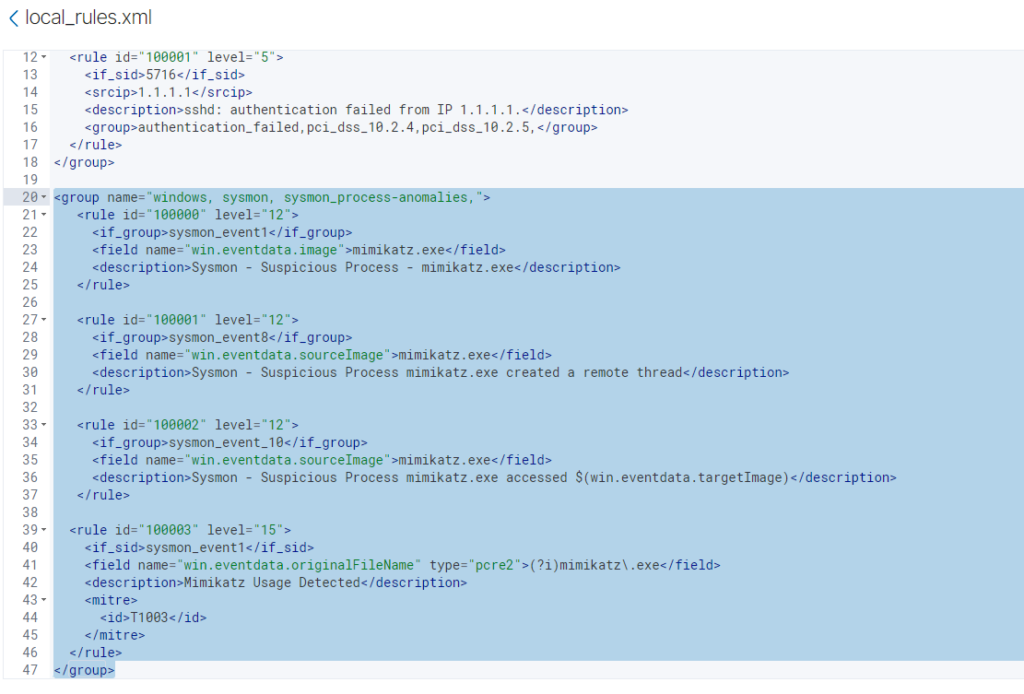
On the Wazuh dashboard page we will click on the hamburger button at the top left corner of the screen and select Server management > Rules > Manage rule files > Custom rules

We will add the following rule and save the change, and click on the prompted restart button at the right top corner
<group name="windows, sysmon, sysmon_process-anomalies,">
   <rule id="100000" level="12">
     <if_group>sysmon_event1</if_group>
     <field name="win.eventdata.image">mimikatz.exe</field>
     <description>Sysmon - Suspicious Process - mimikatz.exe</description>
   </rule>

   <rule id="100001" level="12">
     <if_group>sysmon_event8</if_group>
     <field name="win.eventdata.sourceImage">mimikatz.exe</field>
     <description>Sysmon - Suspicious Process mimikatz.exe created a remote thread</description>
   </rule>

   <rule id="100002" level="12">
     <if_group>sysmon_event_10</if_group>
     <field name="win.eventdata.sourceImage">mimikatz.exe</field>
     <description>Sysmon - Suspicious Process mimikatz.exe accessed $(win.eventdata.targetImage)</description>
   </rule>

  <rule id="100003" level="15">
    <if_sid>sysmon_event1</if_sid>
    <field name="win.eventdata.originalFileName" type="pcre2">(?i)mimikatz\.exe</field>
    <description>Mimikatz Usage Detected</description>
    <mitre>
      <id>T1003</id>
    </mitre>
  </rule>
</group>
as seen below:
Simulating attack and verifying detection
Now we can open PowerShell as administrator in our Windows local VM and go to the directory were mimikatz is located and run it as seen below in order to simulate the attack

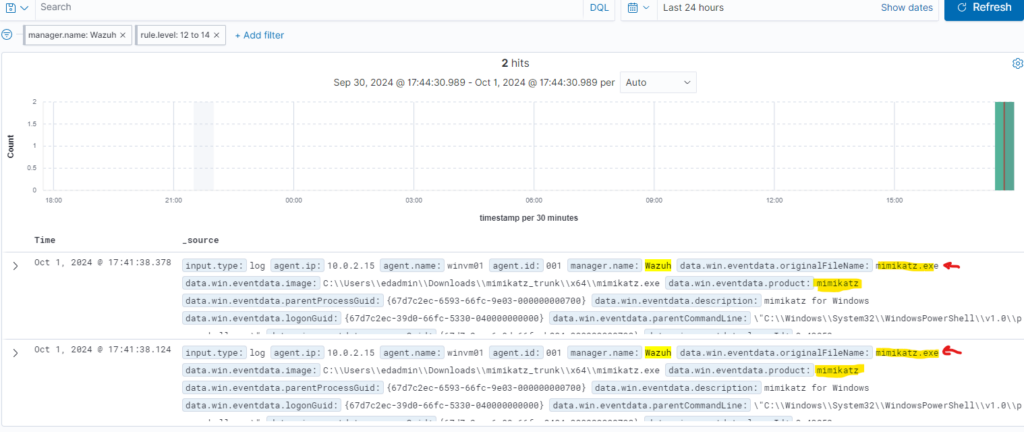
We will go to Wazuh and verify the detection, if we go to the main dashboard we can see its showing 2 high severity events alerts, if we click on the high severity number, we can see the alert details and both are related to the execution of the malicious program mimikatz.exe

Shuffle integration with Wazuh
Go to Shuffle dashboard > create a new automation > for the name we can enter SOC Automation Project > Usecases you can select any, in my case I will select EDR to ticket > click on save changes

On the Workflow page we will drag Webhook option from the left bar and drop it on the main screen, for the webhook we will name it Wazuh-Alerts
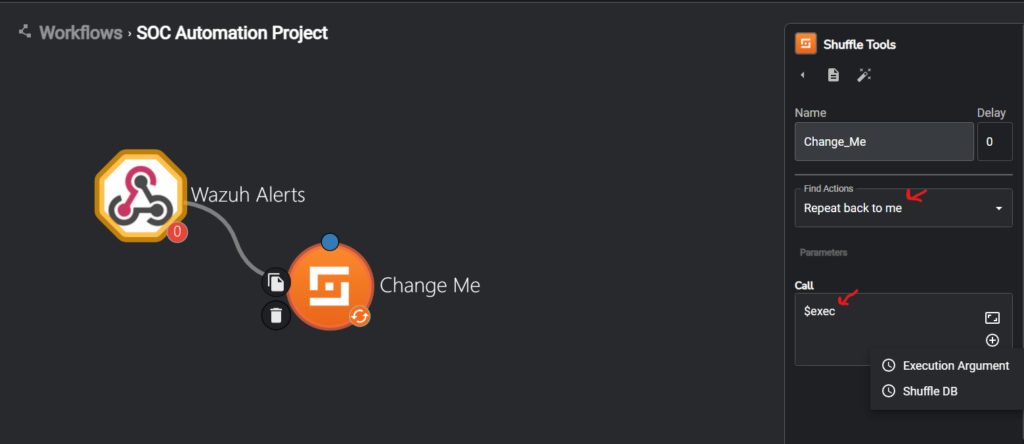
Click on the “Change Me” icon and make sure “Find Actions” is set to Repeat back to me, also on the “Call” section click the add button and select Execution Argument as shown below and click the save button to save the workflow
Now we need to SSH into our Wazuh Manager, we need to tell to connect to Shuffle by adding an integration tag on the ossec configuration file located at
/var/ossec/etc/ossec.conf we can use the following template
<integration>
  <name>shuffle</name>
  <hook_url>http://<YOUR_SHUFFLE_URL>/api/v1/hooks/<HOOK_ID></hook_url>
  <level>3</level>
  <alert_format>json</alert_format>
</integration>
In my case instead of using severity level I will use rule_id

now we can restart our wazuh-manager.service on the wazuh vm droplet like so, and also verify the status to make sure it’s active (running)

Head back to our Shuffle Workflow click on the Webhook and click on start
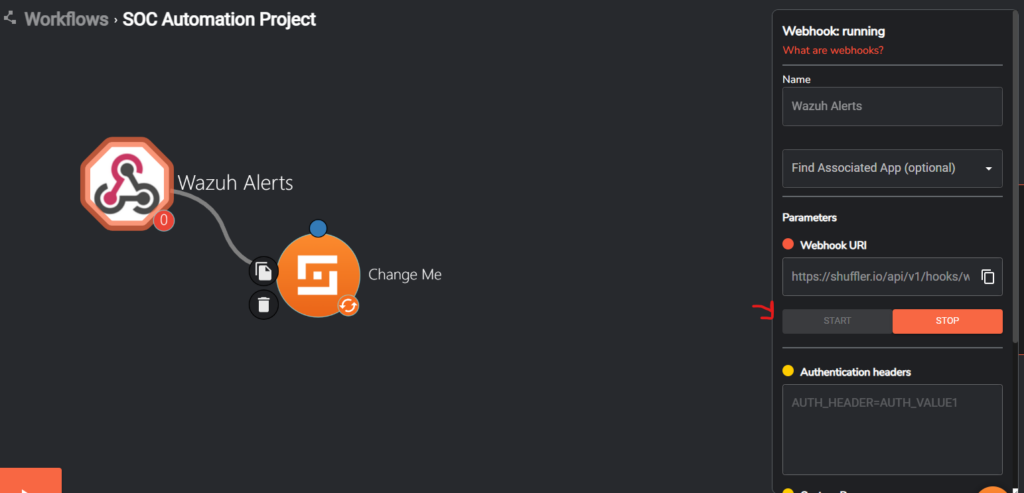
Now we will go ahead and test by running mimikatz on our local Windows 10 VM

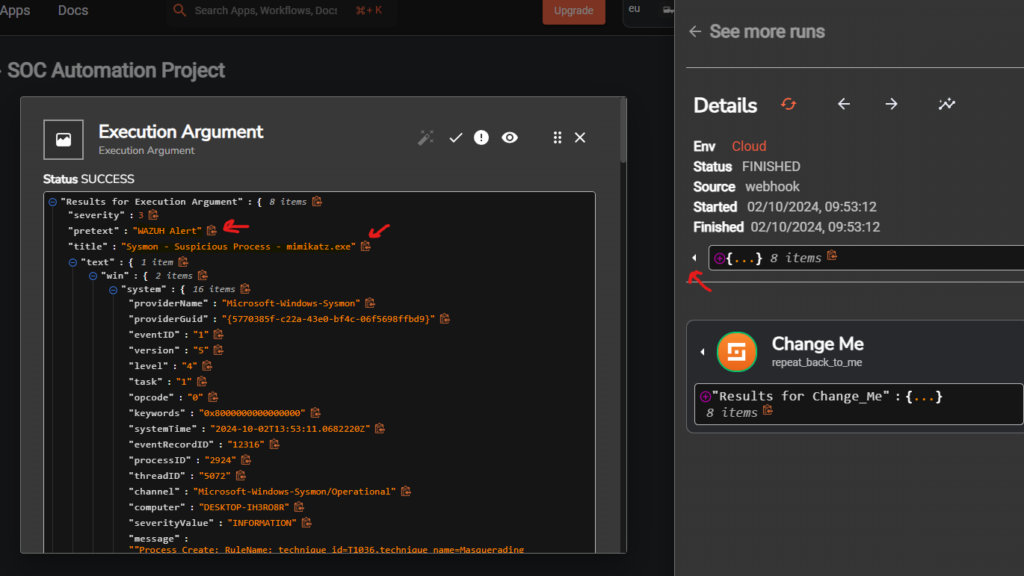
Go back to our Shuffle Workflow and on the bottom menu click on the icon of a running man to see the executions

Click on the detected run and we can see on the details the Wazuh Alert with a title of “Sysmon – Suspicious Process – mimikatz.exe”

Shuffle Data Enrichment Automation – Parsing received SHA-256 hash
Now we will go back to the Workflows dashboard, click on Change Me
In the Input data section click on the plus icon and from the popup menu select Hash
On the Regex section we can use the following regex to parseout the hash value
SHA256=([0-9A-Fa-f]{64})
Click on the save workflow button located on the menu at the bottom of the page

Once saved we can go ahead an click on the run button as seen below
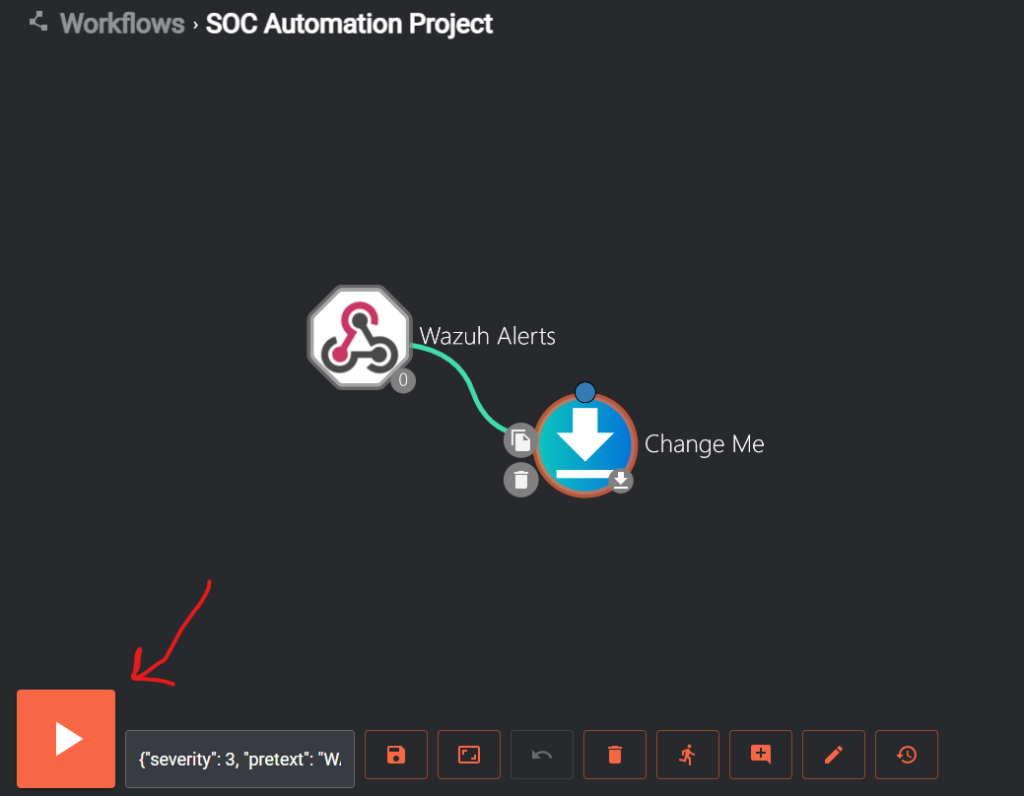
On the Change Me results for the run we can see that we are getting the SHA256 value parsed using the regex formula.
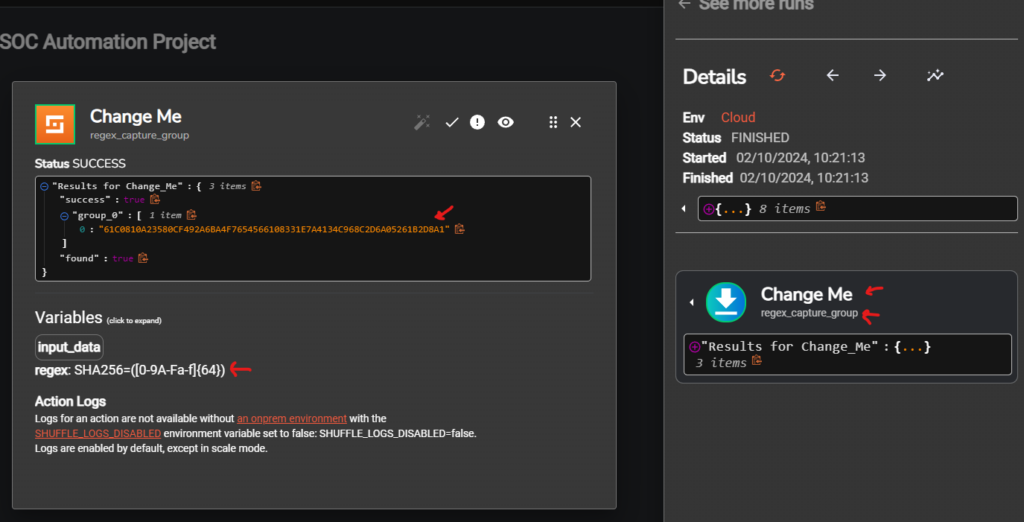
Now that we have confirmed its working as expected we can go ahead and change the name of the workflow from Change Me to SHA256_Regex

Shuffle Data Enrichment Automation – Enriching data using VirusTotal API
Make sure you have signed up and created an account with VirusTotal
Copy your VirusTotal account’s API Key
On the Shuffle dashboard go to the app search bar and type in VirusTotal and drag and drop the VirusTotal app infront of the SHA256_Regex workflow

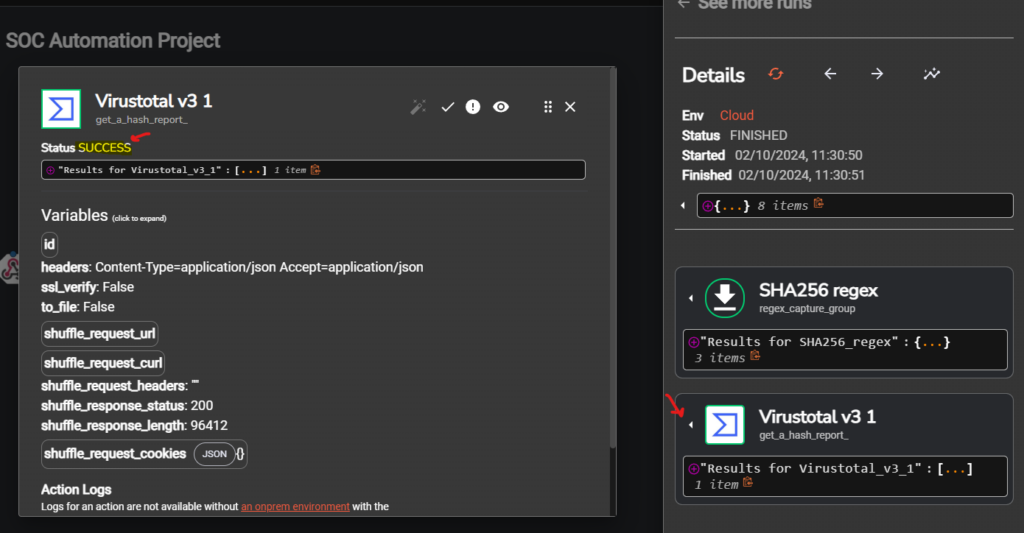
Click on the VirusTotal workflow, on the “Find Actions” section select Get a hash report, click on AUTHENTICATE VIRUSTOTAL V3, on popup window enter your VirusTotal API key

On the Id section click on the plus icon and select SHA256_regex > list
it should look like the screenshot below, now can go ahead an click the save button on the menu at the bottom of the page

We can now test by clicking the Run icon (play button) on the menu the bottom of the page
We can see that we successfully retrieved a reputation check with VirusTotal based on Hash provided
Configuring TheHive
We will start off by creating a new organization and a new user for that organization
on TheHive main dashboard click on the + icon located at the top left corner of the page, enter a name and description for your organization

Once created click on your newly created organization, on the main dashboard for your organization click on the + icon to add a user enter the desired information

Once created hover the mouse over the user and click the Preview button > then scroll down and under the Password section select assign new password

Now we will create a new user for our shuffle service to use, we will use the following configuration

once created hover the mouse over the SOAR shuffle user created and click the preview button > go to the API Key section and click create , this will create an API key that will allow us to authenticate with Shuffle

Integrating Shuffle to The Hive
On the Shuffle main dashboard search for TheHive app and drag and drop it on our workflow like the picture below

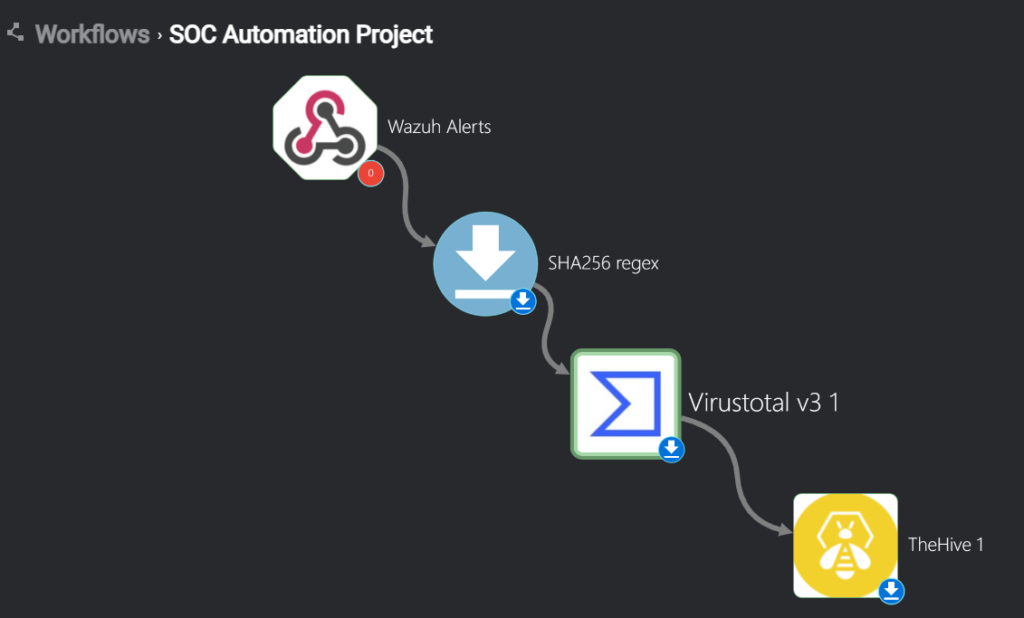
Once connected select he TheHive app on the worflow map, click on the Authenticate TheHive button > enter the API key we got from TheHive and the public IP address of TheHive VM on port 9000 > click on submit > on the find actions section click change it to Create alert


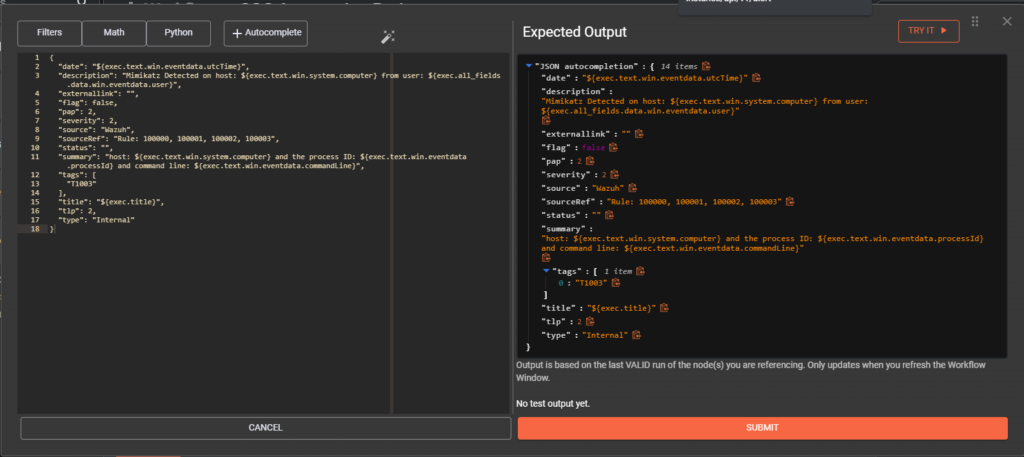
Scroll down to the Body section and click the expand button > copy and paste the below JSON code and click submit

{
  "date": "${exec.text.win.eventdata.utcTime}",
  "description": "Mimikatz Detected on host: ${exec.text.win.system.computer} from user: ${exec.all_fields.data.win.eventdata.user}",
  "externallink": "",
  "flag": false,
  "pap": 2,
  "severity": 2,
  "source": "Wazuh",
  "sourceRef": "Rule: 100000, 100001, 100002, 100003",
  "status": "",
  "summary": "Mimikatz detected on host: ${exec.text.win.system.computer} and the process ID: ${exec.text.win.eventdata.processId} and command line: ${exec.text.win.eventdata.commandLine}",
  "tags": ["T1003"],
  "title": "${exec.title}",
  "tlp": 2,
  "type": "Internal"
}
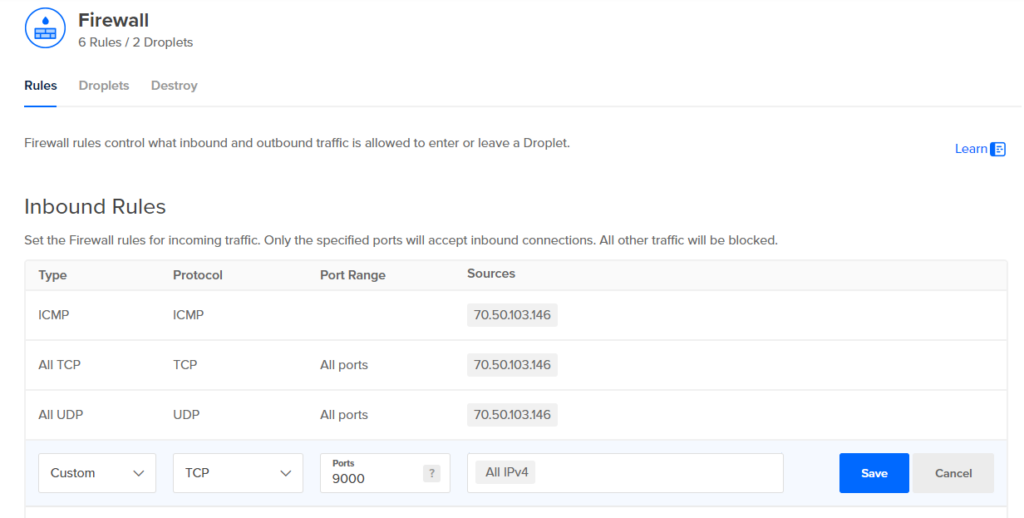
Now we need to create a temporary new firewall rule that allows inbound traffic from any source IP address to our TheHive VM Droplet on port 9000 like so
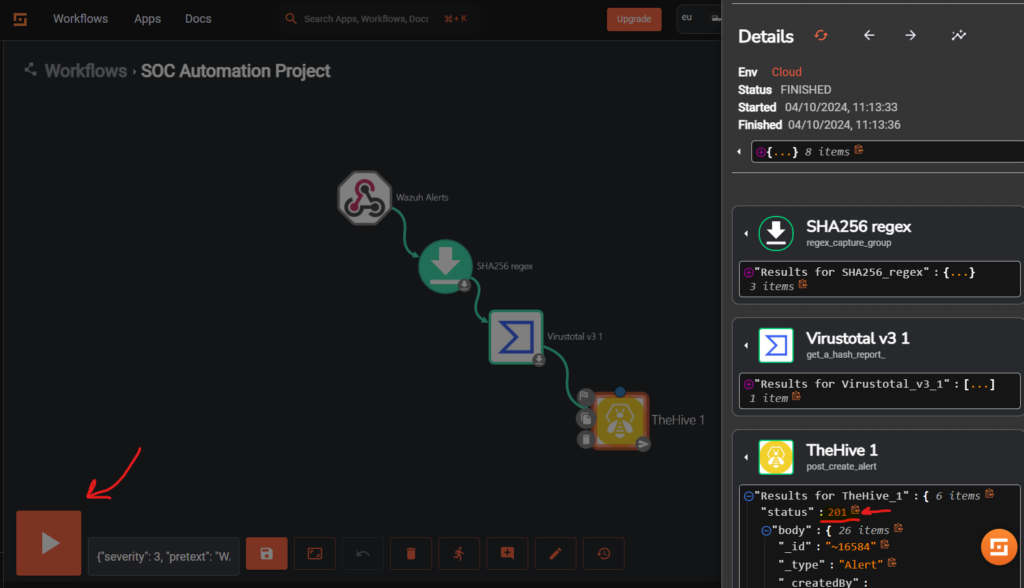
Now we can go back to Shuffle and run the workflow by pressing the play button at the bottom of the screen, we can see it has completed with a 201 status code and we successfully got an alert on TheHive

Configuring email alert automation with Shuffle
On the search bar type in Email and select the Email app
Drag and drop it to the workflow and connect it to the VirusTotal app as seen below


Select Email app and we can go ahead and fill out recipient, subject and body as seen below, save changes and we can go ahead and re-run the workflow using the play icon
Time:
$exec.text.win.eventdata.utcTime
Title:
$exec.title
Host:
$exec.text.win.system.computer


