source: AZ500-AzureSecurityTechnologies
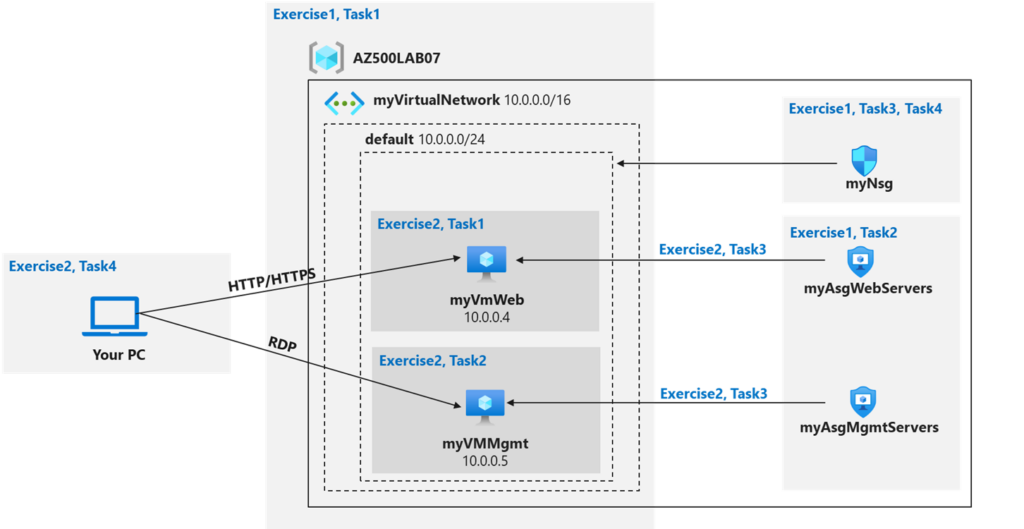
- The organization has two groups of servers: Web Servers and Management Servers.
- Each group of servers should be in its own Application Security Group.
- You should be able to RDP into the Management Servers, but not the Web Servers.
- The Web Servers should display the IIS web page when accessed from the internet.
- Network security group rules should be used to control network access.

- Exercise 1: Create the virtual networking infrastructure
- Exercise 2: Deploy virtual machines and test the network filters
Exercise 1: Create the virtual networking infrastructure
- Task 1: Create a virtual network with one subnet.
- Task 2: Create two application security groups.
- Task 3: Create a network security group and associate it with the virtual network subnet.
- Task 4: Create inbound NSG security rules to all traffic to web servers and RDP to the management servers.
Task 1: Create a virtual network
On the Azure portal top search bar type vnet or virtual network and click on virtual networks

click create new network and use the following settings


click review and create and we should now have our virtual network created and deployed.
Task 2: Create two application security groups.
On the top search bar we can type ASG and click on Application Security Groups

Click create application security group, this will be the application security group for web servers, we will use the following values, then click review and create.
| Resource group | AZ500LAB07 |
| Name | myAsgWebServers |
| Region | East US |
now go back to the application security groups main page and click create, this will be the application security group for the management servers, we will use the following values, then click review and create.
| Resource group | AZ500LAB07 |
| Name | myAsgMgmtServers |
| Region | East US |

Task 3: Create a network security group and associate the NSG to the subnet
On the top search bar we can type NSG and click on Network Security Groups

Click Create network security group, we will use the following values, then click review and create.
| Resource group | AZ500LAB07 |
| Name | myNsg |
| Region | East US |
once deployment is complete click go to resource

Now we need to associate the Network Security Group to our subnet 10.0.0.0/24 called default, so we will go to subnets > click associate and select default


Task 4: Create inbound NSG security rules to allow traffic to web servers and RDP to the management servers.
On the left menu select Inbound security rules and then click + Add

We need to create an inbound rule that allows web traffic going to the webserver, and we need to create another inbound rule that allows RDP traffic going to the management server. We will use the following configuration:
| Destination | in the drop-down list, select Application security group and then click myAsgWebServers |
| Destination port ranges | 80,443 |
| Protocol | TCP |
| Priority | 100 |
| Name | Allow-Web-All |

| Setting | Value |
|---|---|
| Destination | in the drop-down list, select Application security group and then click myAsgMgmtServers |
| Destination port ranges | 3389 |
| Protocol | TCP |
| Priority | 110 |
| Name | Allow-RDP-All |


Exercise 2: Deploy virtual machines and test network filters
- Task 1: Create a virtual machine to use as a web server.
- Task 2: Create a virtual machine to use as a management server.
- Task 3: Associate each virtual machines network interface to it’s application security group.
- Task 4: Test the network traffic filtering.
Task 1: Create a virtual machine to use as a web server.
On the top search bar you can type VM or virtual machine and click on

Click on create > Azure virtual machine , we will use the following configuration
| Subscription | the name of the Azure subscription you will be using in this lab |
| Resource group | AZ500LAB07 |
| Virtual machine name | myVmWeb |
| Region | (US)East US |
| Image | Windows Server 2022 Datacenter: Azure Edition- x64 Gen2 |
| Size | Standard D2s v3 |
| Username | Student |
| Password | Please create your own password and record it for future reference in subsequent labs |
| Confirm password | Retype your password |
| Public inbound ports | None |
| Would you like to use an existing Windows Server License | No |


click review + create and go ahead and create the virtual machine
Task 2: Create a virtual machine to use as a management server.
On the Azure portal, navigate back to the Virtual machines blade, click + Create, and, in the dropdown list, click + Azure virtual machine. We will use the following configuration:
| Setting | Value |
|---|---|
| Subscription | the name of the Azure subscription you will be using in this lab |
| Resource group | AZ500LAB07 |
| Virtual machine name | myVMMgmt |
| Region | (US)East US |
| Image | Windows Server 2022 Datacenter: Azure Edition – x64 Gen2 |
| Size | Standard D2s v3 |
| Username | Student |
| Password | Please use your personal password created in Lab 02 > Exercise 2 > Task 1 > Step 3. |
| Public inbound ports | None |
| Already have a Windows Server license | No |


click review + create and go ahead and create the virtual machine
Task 3: Associate each virtual machines network interface to its application security group.
In this task, you will associate each virtual machines network interface with the corresponding application security group. The myVMWeb virtual machine interface will be associated to the myAsgWebServers ASG. The myVMMgmt virtual machine interface will be associated to the myAsgMgmtServers ASG.
Go to Virtual Machines > select myVMWeb > Application security groups > click Add application security groups > select myAsgWebServers > click Add

Go to Virtual Machines > select myVMMgmt > Application security groups > click Add application security groups > select myAsgWebServers > click Add

Task 4: Test the network traffic filtering
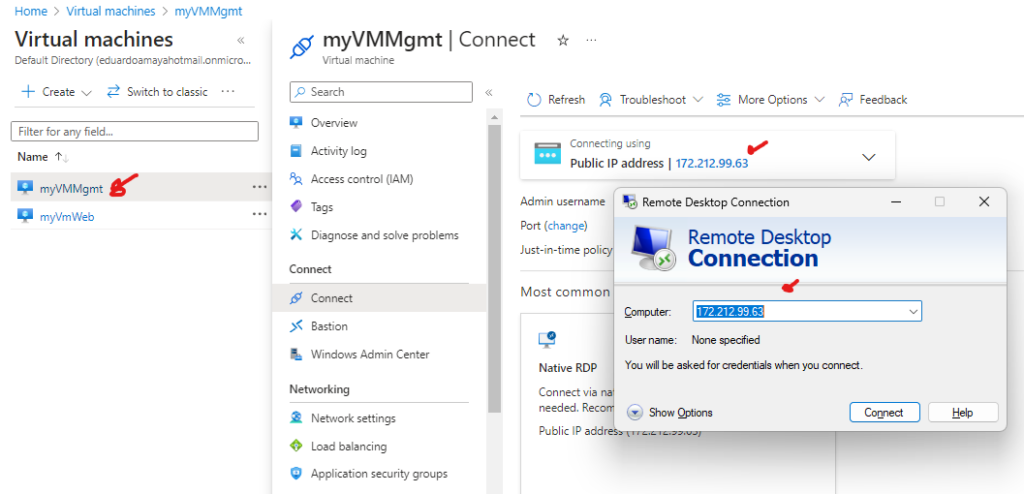
Now lets test trying to RDP into the myVMMgmt
Go to Virtual Machines > select myVMMgmt > look for the public IP address copy it > now on your own PC open up RDP and paste the public IP for myVMMgmt as show below > click connect > enter username and password when prompted.


We can see that we successfully connected remotely.
–
Now Go to Virtual Machines > select myVMWeb > select Run command > select RunPowerShellScript

We will run the following PowerShell command which will install the web server feature on our VM:
Install-WindowsFeature -name Web-Server -IncludeManagementToolsMake sure you wait until its fully installed


once web server feature install is complete
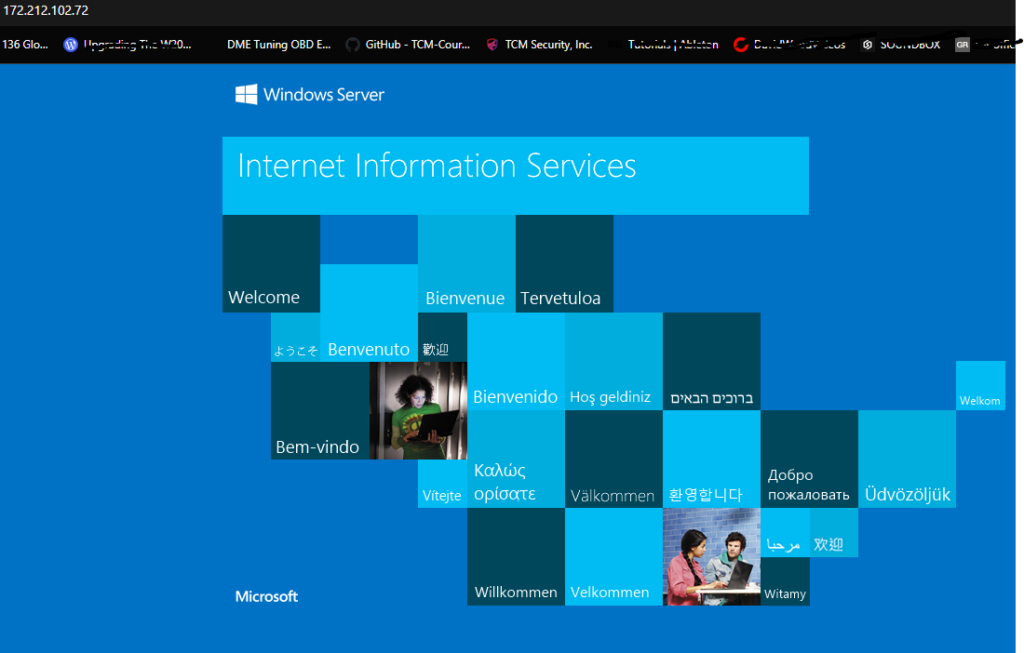
Go to Virtual machines > myVMWeb > Network settings> and copy the public IP

Paste public IP on your browser this should take you to the sample website for the webserver installed on myVMWeb

This completes the proof of concept for this lab
you can remove deployed resources by opening Cloudshell on Azure and pasting/executing following Powershell line:
Remove-AzResourceGroup -Name "AZ500LAB07" -Force -AsJob